CIAO

Sunday, May 2, 2010

Sunshine Smoothie!


3/4 c. milk

1 small container vanilla yogurt (or however much you want)


1 c. frozen raspberries or blackberries


6 strawberries

(1 banana-optional)-may need to add more milk if you add more ingredients


1/4 c. sugar-more or less to taste


Add all in blender and blend!

Who doesn't crave a delicious smoothie every now and then? O.K. I always crave smoothies. The problem is every time I go to make one I never have the stuff. Then when I finally do get the ingredients my smoothies always turn out funky. I like my smoothies really thick and very cold, but they always end up warm and melted. So I decided that I was going to find a smoothie recipe that worked for me and I could actually make. After going through a few recipes I stumbled across this one, and found that it worked perfectly for me!


Berry Yummy Ingredients
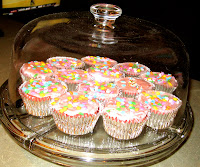
Since I never seem to have the ingredients I need for my smoothies and fruit goes bad so fast, I decided to get frozen fruit. I got frozen strawberries and frozen raspberries. Luckily I already knew where to find the frozen fruit thanks to my strawberry cake. The frozen fruit also helped with making the smoothie stay cold. I went ahead and got a tub of vanilla yogurt because I knew I would want mine really thick. I already had milk, and I had sugar from the broccoli salad. I got a banana but I ended up not using it because it tasted so good just with raspberries and strawberries.

Blending Up Sunshine!
Making a smoothie was probably the easiest of all the recipes, but the most useful to me in my college life. The ingredients are things I can keep around if I get frozen fruits, and it is something I usually crave. I started off by putting the 3/4 c. of milk
at the bottom of the blender. Always start with the milk at the bottom so when you turn on the blender it is easier for the blender to mix. Then I added 2 c. of yogurt to the blender, which would be more than one container because I like mine thick. After that, I added the entire 10 oz. of frozen strawberries, and about half the bag of frozen raspberries. This was the perfect amount of fruit. Since the strawberries were sweetened I only added half the amount of sugar the recipe calls for. Then I blended! I was shocked when my first sip tasted so delicious. I had to split it up into tiny portions and make everyone in the room try a little. It got rave reviews. This smoothie recipe will definitely be a keeper!


Sunny Broccoli Salad!


1 bunch of broccoli
1/4 c. sunflower seeds-or less
1/2 c. raisins-or less
4 green onions-chopped
4 strips of bacon- crisp

Put all these ingredients in a large bowl, big enough to stir it all together.

Dressing:
1 c. mayo
1/3 c. sugar
2 Tbs. cider vinegar

Mix together dressing ingredients. Pour over other ingredients. Mix well and chill to allow to blend. The longer the better.


Broccoli Salad is always a food I think of when I think of the summer time. It goes well with any dish, and it is absolutely delicious. My mom got me hooked on this dish a long time ago as a way to get me to eat my vegetables.

Shopping for Sunny Salad

I never realize how little I know about cooking until I go try and buy the ingredients for my recipes. We all remember what happened with the strawberry cake. Let's just be glad I had taken my boyfriend with me to the grocery store. Green onions are not onions that are green, they are the skinny, tall onions that make little circles when you chop them up. Also, I had to call my mom on the phone to make sure that cider vinegar was the same thing as apple cider vinegar. I didn't want my salad apple flavored! Even though my boyfriend was telling me it was the same thing, I just had to make sure. Luckily, I already knew what mayonnaise, sugar, and raisins were.

Stirring Up Sunny Salad
I started off by putting all the broccoli into a giant mixing bowl. I suggest putting the broccoli into a big bowl because stirring the salad can get very messy. I then chopped up all four of the green onions and threw them into the bowl. I threw in more sunflower seeds than the recipe calls for and less raisins than the recipe calls for. I love sunflower seeds and I am not a huge raisin fan. I also added an extra strip of bacon because I really like the extra crunch the bacon adds. So, I didn't quite follow the exact recipe, but with this salad you can mix and match to go with the tastes that you like. While the bacon was cooking, I threw together the dressing. It really does not look very appetizing while you are mixing it together, but I promise it tastes great! After the dressing was ready I poured it all over the rest of the ingredients. Then I had to mix in the dressing really well to make sure it got all over the broccoli. This is where the big mixing bowl comes in handy. After your arm gets sore from stirring so much, it should be ready. The longer you let it sit in the refrigerator the better it will taste. It allows it to cool and allows the broccoli to absorb the dressing and the full flavors of all the ingredients. Once it has been in the refrigerator long enough to satisfy you, then enjoy your sunny salad!

Cheeseburgers in Paradise!

buns
ground beef
cheese
salt
pepper
garlic salt

Patty out the beef, season the patties, cook the burgers, enjoy!! How easy is that?


Cheeseburgers are probably my favorite food ever. I can't believe this wasn't the first thing I learned how to cook. My boyfriend and I have a cheeseburger night about once a week and it never crossed my mind that I could actually cook them for once. So when I needed something else to learn to cook for my blog I realized this would be the perfect thing!


Cooking a cheeseburger is actually a very simple thing and I was upset with myself for not learning sooner! Think of all the cheeseburgers I have missed out on eating because I didn't know how to make them myself. They can be a great summer food too! Just throw them on the grill at a party and go!


Preparing for Paradise!

Just get enough ground beef to make as many burgers as you want to make, and enough to make them as thick or as thin as you like. I personally like my burgers really thick. I think my boyfriend and I get in a fight over who's burger is thicker every time he makes the burgers. Well, now we won't have to because I can make them myself! Get whatever kind of buns you prefer and however many you need. I prefer French bread or Italian rolls over normal buns. I think it adds something to the taste of the burger. I like to top my burgers with a slice of American cheese and a slice of provolone cheese. Most people just do one slice of American cheese. I also like my cheeseburgers with a slice of pepper-jack cheese. It is really all about what taste you like! I'm sure most households have salt, pepper, and garlic salt, but if not pick those up too!

Making Your Burgers "Paradise Perfection"

First start by forming the ground beef into patties. You do this by rolling the meat into a ball, and then flatting the meat out into a circle that is the width and thickness that you desire for your burger size. Do not play with the patties too much or the meat will not stick together and the patties will start to break apart. Then it is time to season your patties with the salt, pepper, and garlic salt. Do not, however, spill a heap of garlic salt onto your burger while trying to take a picture. ( Pictured to the right.) You can add the desired amount of seasoning for the taste that you want. More seasoning, more flavor! Now it is time to cook the burgers! The best taste comes from the grill, but since I live in an apartment I learned how to cook my burgers in a skillet. Turn the stove on medium/high heat, and set your patties in the skillet. You will be able to tell when your skillet has heated up because your patties will start to sizzle. Once they have started to sizzle it will be about seven minutes for each side of the patty. A good trick to remember is to know when your burgers are done cooking is to watch for when the juice runs clear. Right before you are about to pull the burger off the skillet is when you add your cheese. Let it melt and then take the burger off! Set the burgers on paper towels when you take them off, to let the grease drain off the burgers. Do not put them straight on the bun because this can make the bun soggy with grease. Once they have sat and cooled for a second you can put the cheeseburger in your bun and enjoy!

Summer Time Food!

In my next few blogs I am going to be making a few fun summer time recipes. From a smoothie to a cheeseburger I will walk you through how I made these tasty treats. I will be making "Cheeseburgers in Paradise", "Sunny Broccoli Salad", and a "Sunshine Smoothie" in my next three entries. You are getting ready for the summer time and now you can prepare your summer food without mistakes after reading through my blogs!

Thursday, March 4, 2010

Chocolate Cake Catastrophe!


Moist Chocolate Cake
2 cups of sugar
1-3/4 cups all-purpose flour
3/4 cup baking cocoa

2 teaspoons baking soda
1 teaspoon salt
2 eggs

1 cup strong brewed coffee

1 cup buttermilk
1/2 cup vegetable oil 1 teaspoon vanilla extract
1 tablespoon confectioners sugar


In a large mixing bowl, combine the first six ingredients. Add eggs, coffee, buttermilk,oil and vanilla; beat on medium speed for 2 minutes (batter will be thin.) Pour into a greased and floured 10-in. fluted tube pan.
Bake at 350° for 45-50 minutes or until a toothpick inserted near the center comes out clean. Cool for 10 minutes before removing from pan to a wire rack to cool completely. Dust with confectioners' sugar.

This is my absolute favorite cake of all time, and my favorite dessert for that matter. This is the cake my mom always makes me for my birthday! I have seen it made many times and I have actually helped make it a couple of those. You would think that helping cook the cake before would have given me the upper edge on the whole experience, but NO...

CHOCOLATE GOODIES
The ingredients for the chocolate cake are very simple. The only thing I didn't have in my apartment was buttermilk and I also had to make a small pot of coffee. Other than that it is such an easy recipe for such a delicious cake. It is usually meant to be cooked in a 10 in. fluted tube pan but my roommate wanted her birthday cake to be "heart shaped". First lesson I can share here is to not cook a cake in a pan other than the pan that the recipe calls for. There was a specific reason why this cake is done in a fluted pan, and I didn't even think about it.

COOKING UP CAKES
I know I have said It is such a simple recipe, and it really is! I felt like I was done mixing it up in no time. I just got out my giant mixing bowl and started off with the first 6 dry ingredients. Then
I added in the rest of the wet ingredients. Nothing tricky or complicated and even I knew what everything was! I didn't even need a mixer and I just stirred it up with a spoon until there were no clumps. The batter will be very runny, but that is why the cake is so moist and yummy. Voila! That's all for the batter! I greased up my heart shaped tins until they were dripping with Pam and then poured the batter evenly into both of them. Then I popped them in the oven on 350° for 45 minutes. Easy as pie! Wait, easy as cake!

BAKING? SIMPLE?

I almost had myself fooled there for a second. I thought this was going to be easy. I should have known something was going to go terribly wrong. About 25 minutes into the baking time I smelled an awful burnt chocolate smell filling our whole apartment. I ran to the oven to find chocolate spilling out all around the heart tins and all around the edges were burning. The center of the cakes were hardly cooked and the outer rings were burned to a crisp. I should have known that I couldn't cook this cake in a heart shape flat pan but I didn't even think about it. There was also too much batter in both heart pans for the cake to cook evenly and it needed a different temperature and cook time to cook it right. When I took both cakes out of the oven I let them cool for a long time since they were barely even cooked. When I went to flip the first one out of the tin it got completely stuck and the middle uncooked part stayed in the tin and the rest fell out. It was destroyed. There was no resemblance to a heart what so ever. The second heart was my last shot, and this was the less exploded heart. I flipped it over very slowly, patted it on the back and then a heart actually came out! There were some missing pieces to the heart but it was good enough to make a birthday cake out of. The lesson I learned here was to cook in what the recipe calls for. Though mainly I learned not to let my friends get choosy, even if it is their birthday.

DECORATING THIS DISASTER
As we know I will no longer be making icing, so for this cake I used the store bought kind. If it was up to me there would not have been any icing on the cake since this chocolate cake is supposed to be made icing free. Once again the lesson to be learned, choosy friends ruin food. This cake would normally be a plain moist chocolate cake, and it is delicious. Without the mess ups and heart shapes it is a great cake for beginners to try. If you are a chocolate cake nut like me, this one's for you.


Extra Special Caution:
Do not leave cakes in the oven to hide them. It may or may not result in your roommate's parents turning on the oven to preheat it thus melting the cake and making the fire alarm go off. Then your cake will be unreadable and look like goo. (See photo on left.)


THIS GETS VOTED BIRTHDAY SCUM.

Wednesday, March 3, 2010

A SURF AND TURF ANNIVERSARY

Mashed Potatoes
5-6 Potatoes
1 1/2 sticks butter
1/2 cup milk
3 Tbsp sour cream
1/3 cup shredded cheddar cheese
salt
pepper
cajun seasoning
garlic seasoning


Filet Mignon In 1 2 3

garlic salt
cajun seasoning
steak seasoning (interchangeable with the flavoring you prefer)
pepper
1 Filet
olive oil


Simple Spicy Tilapia
olive oil
butter
cajun seasoning

1 tilapia filet


That's all you need! It's so easy, and I thought cooking was supposed to be hard...

The fish in the fish recipe can really be interchangeable with any fish that you enjoy. In my boyfriend and I's case we really like tilapia so that is the fish I picked up at the grocery store. You could also pick whatever meat is your favorite to put in place of the filet mignon. These are the simplest forms of how to cook a piece of fish or a piece of meat and perfect for beginner cookers. Like me! The seasonings vary, depending on how much you want on that particular dish. Mashed potatoes are a great side dish to a lot of meals so I thought those would make a great thing for me to learn how to cook, too. As I go on I will be more specific on how I cooked my meal and how I messed it up.

DINNER DELISH or DINNER DISASTER

For my boyfriend and I's anniversary I thought I would try and cook the dinner this time. He is a very good cook and cooks for me all the time, it is kind of embarrassing that I have never cooked for him. I really hope that me cooking this meal doesn't make this our last anniversary. At least I don't have to make anything heart shaped.

FILET MIGNON
First I covered the filets in olive oil and then covered them with the seasonings on top and bottom. I sprinkled the seasonings just lightly and enough to get the taste that I desire. Once those were seasoned I started to heat up the skillet. I needed to make sure and get the skillet really hot. Once it was hot enough I melted butter on the bottom of the skillet to cook the steak in. When the butter was melted and bubbling I threw the steaks on. I cooked each side for
about a minute total and then turned the power down lower. Then I started to cook it slower and pay close attention until it was slightly pink in the center like I like it. I can tell that cooking steak is going to take a lot of practice to get it down to perfection. Depending on how big or small the steak is will also determine how long to cook it. Be careful of the seasonings you pick. The steak seasoning I got to put on my steak had fennel in it which I cannot stand. I can taste it in anything and it completely ruined my steak.


TILAPIA
I began with the fish by covering the filets with olive oil and then covering
them in a spicy cajun seasoning. Once the fish were drenched in seasoning, I started up the skillet. Like the steak, I made the skillet very hot. I covered the bottom with olive oil and once it got hotter I melted butter all over the bottom too. Once it started popping I threw on the fish. I just cooked it by eying it, once one side looked blackened I flipped it over. When I started on the other side I turned down the heat some and then waited till I thought it looked blackened enough for me. Depending on the thickness of fish you would need to cook it longer or shorter. It really took no time at all!

MASHED POTATOES
First with the potatoes I had to clean them and peel them. Then I had to cut them up and boil them in a big pot of water. I knew they were done cooking once I could stick my fork through them easily in the pot. I drained the water out and then got to mashing. Throughout the mashing process is when I got to add all the good stuff. Adding the milk first makes them easier to mash and mix in the other things. I added too much milk and I ended up not liking the potatoes because I don't like when mashed potatoes are too "fluffy". So I would suggest less milk to people who don't like their potatoes too fluffy. After the milk I added the butter and sour cream. I shook the seasonings all over the top of the potatoes
and I thought that made for a very nice taste. I added the cheese last so the potatoes would be nice and hot and it would melt fast. I stirred the potatoes all up together and that was it! They would have been excellent had they not been so fluffy.


VOTED ANNIVERSARY YUM BY ONE!

Yes, we are still together and my cooking did not cause a breakup.


Monday, March 1, 2010

Strawberry Cupcake Surprise!

Strawberry Cupcake Recipe
White Cake Mix
3 oz. Strawberry Jello
2 Tablespoons Oil
1 1/3 Cup Water
3 Eggs
10 oz. Frozen Sweetened Strawberries

Combine these ingredients and then add a thawed and drained package of frozen strawberries. Save the juice. Bake according to the directions of the cake mix.
Top with Icing made from 1 box of 10x sugar, 1 stick of butter, and enough strawberry juice to make smooth. Beat to fluff at high speed of mixer.

GROCERY GOODIES
This is actually a strawberry cake recipe of one of my best friend's mom that she made for me on my birthday but since it was so incredibly delicious I decided to pick this as my first challenge. I was actually expecting it to be very hard considering it was such a yummy cake, but it turned out to be a much more simple recipe.

First off, I started by going to the grocery store and getting all the ingredients I needed for birthday goodies I was planning on cooking. I had a lot of them all ready in the apartment thanks to my cooking roommates, definitely no thanks to me. Since I know nothing about cooking I spent most of the time picking out the ingredients on the phone with my mom, it's embarrassing I know. I even asked how much 3 oz. of Jello was, I then looked at the box and realized that all the boxes of Jello are 3 oz. It took me about 15 minutes searching through the frozen strawberries trying to find 10 oz. I could find 8 oz. and 16 oz. and then I didn't know how I would ever be able to measure out 10 oz. with my pathetic cooking mind. Then right in front of my face I saw a 10 oz. package of sweetened frozen strawberries. So have no fear there is a 10 oz pack out there, Birds Eye frozen strawberries in "delicious syrup".
When I went down the aisle to get "10 times sugar", of course I had no clue what that meant. "Sugar times 10 of what?" My mom just laughed at me and told me that 10x sugar was powdered sugar or confectioners sugar and I would need a whole box to make frosting. Well now that I had all my ingredients it was time to get cupcaking!

COOKIN' UP CUPCAKES
I started by getting out all the ingredients I was going to be using and by getting out the mixer to put them all in. I also got out other bowls to keep on the side to mix things in. I preheated the oven so it would be nice and toasty for my cupcakes when it was time. First I mixed all the dry ingredients in the mixer together, and I mixed the wet ingredients in a separate bowl. It is a good idea to crack the eggs in another separate bowl and not straight in with your wet ingredients so shell doesn't get in it. I learned this the hard way. I started to crack my eggs straight into my water and oil and got pieces of shell all in it and had to fish it out with a spoon. The next two eggs I cracked into a separate bowl and then added them in with the oil and water. That worked out much better. Next I added my wet ingredients into the mixer with my dry and turned on the mixer at a nice "cake speed". Then it was time to add in the strawberries. I had them sitting out so they had defrosted some but I still had to microwave them for a little while. I put them in a bowl completely unwrapped in the microwave and did them on defrost for about a minute. They were still pretty frozen so I kept doing 30 second increments. Once they got mushy, but not too mushy, I took them out. I used a colander with a bowl under it to save the juice. I chopped them up in the colander and the bowl being under it saved all the "delicious" juice for the frosting later. I'm sure something smaller or with more tiny holes would have been better but we didn't have such a thing in our apartment. Once they were all chopped up and I had enough juice I added them into the batter and turned the mixer back on. When it was all mixed together and smooth looking I turned off the mixer and decided it was time to put in the cupcake liners! Once the tin was all lined I started to pour in the batter.

Here is where I made a mistake. This recipe made a lot of batter, since it was meant for a big cake, and I only had one cupcake tin. The tin only made 12 cupcakes at a time. I should have gotten a bigger cupcake tin or two cupcake tins. Especially since I was making them for a lot of people I didn't plan well enough ahead. So I had to keep doing rounds of cupcakes, once one was done I would stick another one in and wait around for it. It was just very time consuming. On the bright side I got to decorate while the others were in the oven!

Yes, I decorated with icing and sprinkles. Never again will I eat strawberry icing or use sprinkles. I don't even like icing and If I have a cake I like them icing free. So while I am making this icing I am getting it ALL OVER my hands and having to lick it off every second because I don't want to waste anymore paper towels. Remember I am a college student. I did enjoy this icing when I had it in a small dose, but I don't think I will be eating it again anytime soon. I suggest mixing all the strawberry juice you have left into the frosting, the more the merrier. The sprinkles also made a huge mess everywhere but they sure looked cute! Decorating the cupcakes was by far the best part of cooking the cupcakes and they turned out delicious! That was the vote of the birthday girl herself, and of many other taste testers I had try the cupcakes.

THIS GETS VOTED BIRTHDAY YUM!